This Valentine season we, at Art Hours, have tried many different crafts and amongst them is making clay trinkets. We used air dry clay for these little trinkets. It is a craft activity that kids can try by themselves with little adult supervision; leave them with clay and you will see your little kids being occupied with clay for hours together. This activity was done by my 8-year old kid with great ease. For making these trinkets you don't need sophisticated tools or equipment. As a matter of fact, we just used whatever toys we found around the house.
 |
| Clay Heart Trinket |
Materials required:
- Air Dry Clay (any brand will do) - We used Fimo Air Dry Clay.
- Cookie cutters or plastic clay moulds to cut out different shapes
- Toothpicks to make holes and/or add surface texture
- Simple tools like sketch pen caps, or other toy tools to add surface texture - get creative here
- Paints - Acrylic paints or poster colors will also do
- Strings or ribbons to pass through the trinkets
Procedure to make the Clay Trinkets:
Step 01 - Shaping the Clay Trinkets:
We started by rolling out a ball of clay of about 2" in diameter, flattened it by a rolling pin and then used different cutters for the required shapes. We used cookie cutters for the hearts and the flower. The size of the heart trinkets are about 3.5 cm and the flower trinkets are about 3.0 cm. The thickness of all the clay trinkets is around 0.5 cm. We didn't make them very thick since we planned to use these trinkets as lockets or charms, so they had to be light weight. The picture that you see below are of the wet clay trinkets after we added surface textures.
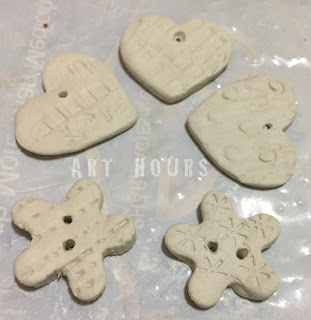 |
| Wet Clay Trinkets |
Step 02 - Adding Surface Textures
After cutting out different shapes of the trinkets we applied texture on to its surfaces using sketch pen caps, a toy wheel or just a toothpick. We also made sure that we make a hole in them using a toothpick to pass a string later. Till here, my kid handled the activity with great creativity and patience. It was fun to add textures using different toy tools she had.
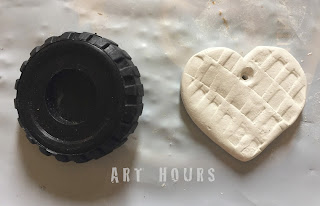 |
| Adding texture with a toy wheel |
Step 03 - Curing or Drying the Clay Trinkets:
We left the clay trinkets to dry for more than a week. In the picture below you see the clay trinkets after it has been cured in the sun for more than a week now. Yes, it took more time to dry since it is winter here and we aren't getting much of the sun lately. The clay trinkets have turned out beautiful and the white color that it has achieved after drying makes it look more pretty. They are ready to be used and don't need any painting. You could just make them waterproof by applying a layer of mod podge and done.
 |
| Air Dry Clay Trinkets after they have been cured/dried |
Step 04 - Painting the Clay Trinkets:
We added some colors to the trinkets since we wanted to gift them this valentine season and inevitably colors are a must for this activity. So our next step is painting and this is where I took over. All said and done, my kid was disappointed since she wasn't allowed to paint them. I promised her that she would be allowed to do so in the next class, I was thankfully spared this time!
I used poster colors and acrylic colors to paint these trinkets. This is how I started painting. I used a 0 number brush for the text or small areas which required detailing while for other areas I used a round or a flat brush as required.
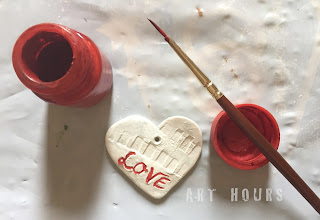 |
| Painting the clay heart trinket |
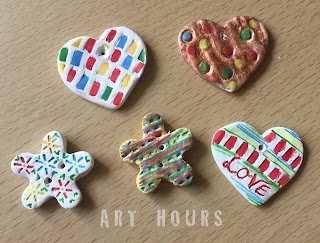
This is what the clay trinkets looked like after painting them with poster colors. For the brown heart in the right side, I used metallic bronze acrylic paint as the base color and then applied poster colors to the dots. Rest were all painted with poster colors only. I was rather happy with the white background and just primary colors for the details.
Step 05 - Adding Strings or Ribbons
We did leave tiny holes in all the trinkets so that we could string them later. Don't forget to leave holes before you leave them to dry. Also, make sure the holes are big enough to pass a string or a ribbon. You can use a toothpick or a skewer stick or even a straw for that matter. Now to string them, you can use a fabric string, ribbons or any material that you wish to.
As you see below, this is how I ended up with the clay heart. It is ready to be used as a gift tag stringed with a ribbon. With lots of birthdays and anniversaries lined up this month, these clay trinkets are going to be very useful this season.
 |
| Clay Heart Gift Tag |
So, finally, the mother-daughter duo did end up with something beautiful and useful - little clay trinkets to be used as lockets or charms or gift tags for gifting purpose. You can combine beads and buttons or add fancy ribbons...just use your imagination and be creative.
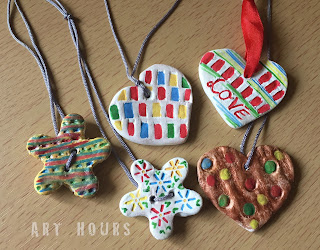 |
| Air Dry Clay Trinkets for the Valentine Season |
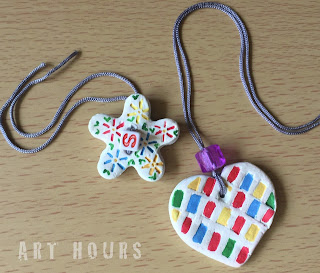 |
| Clay Trinkets combined with beads |
Try out this activity with your kids. It will be fun indeed. Moreover, it is not too late and with Valentine's day just around the corner, this would be an activity both mother and child would enjoy. So start spreading love, for love begins at home!
---

No comments:
Post a Comment